LippyeMacSupport

LIPPYE FOR MAC · SETUP GUIDE

A few clicks.
Then just speak.

Give Lippye a microphone, make room for the Fn key, and capture your first thought.

Apple silicon · macOS 26 or later · No account required

01

MAKE YOURSELF AT HOME

Move Lippye to Applications.

  1. Open the Lippye disk image. If you are updating, quit the running copy of Lippye first.
  2. Drag Lippye onto the Applications folder.
  3. Eject the Lippye disk, then open Applications → Lippye. If macOS asks whether to open this downloaded app, choose Open.

Open the installed copy in Applications for setup. The illustrated guide opens once and is always available again from Help → Mac Setup Guide or Settings → Quick setup.


02

LET LIPPYE HEAR YOU

Allow Microphone.

  1. In Lippye’s setup window, click Allow Microphone, then allow the macOS prompt. You can also click the microphone button in Lippye to request access.
  2. If access was denied, open System Settings → Privacy & Security → Microphone.
  3. Turn Lippye on. In Lippye → Settings → Microphone, choose the microphone you want to use.
Privacy & Security Microphone
Actual macOS Microphone settings screenshot: Lippye is switched on.
The Lippye switch should be on.

Lippye missing from the list? Request microphone access from Lippye once, then reopen this pane.

Open Microphone settings ↗
03

CONNECT YOUR SHORTCUTS

Allow Accessibility.

  1. Open System Settings → Privacy & Security → Accessibility.
  2. Turn Lippye on. Authenticate if macOS asks.
  3. If Lippye is missing, click +, choose Applications → Lippye, and click Open.
  4. Return to Lippye and click Enable Shortcuts in the setup window or Settings.
Privacy & Security Accessibility
Actual macOS Accessibility settings screenshot: Lippye is switched on.
This allows Fn shortcuts and typing into other apps.

If macOS also requests Input Monitoring, enable Lippye under Privacy & Security → Input Monitoring. Quit and reopen Lippye if macOS asks, then enable shortcuts again.

Open Accessibility settings ↗
04

ONE KEY, READY FOR YOUR VOICE

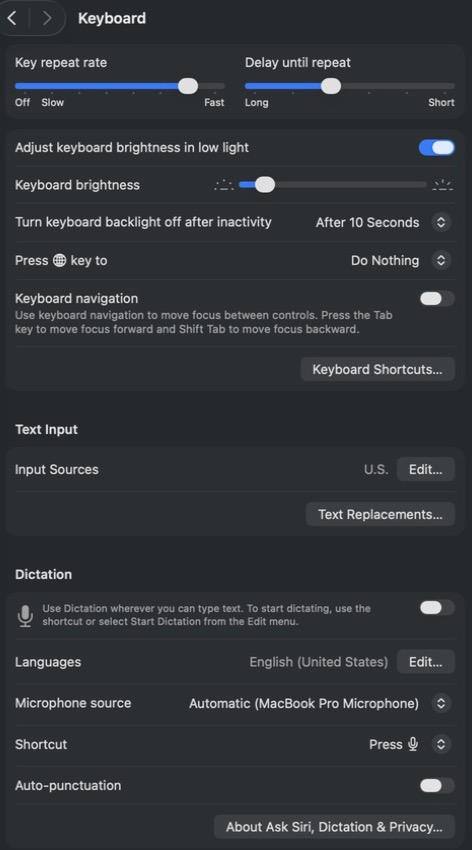
Set Fn / Globe to Do Nothing.

  1. Open System Settings → Keyboard.
  2. Set Press 🌐 key to (or Press fn key to) to Do Nothing.
  3. In the Dictation section below, turn Apple Dictation off or choose a shortcut that does not use Fn.

“Do Nothing” frees the key from Apple’s built-in action. Lippye will use it for your shortcuts.

Open Keyboard settings ↗
Actual macOS Keyboard settings showing Press Globe key to set to Do Nothing and Apple Dictation switched off.
Keyboard settings with Fn / Globe ready for Lippye.
05

YOUR FIRST THOUGHT

Try “Remember to pick up milk.”

Press fn + S and release both keys. A new sticky opens and starts listening when the microphone is ready. Say your reminder, then press fn to finish. Your words appear after local transcription and cleanup.

fn

Dictate anywhereClick an editable text field. Hold Fn to speak, then release to finish.

fn × 2

Hands-free dictationDouble-tap Fn. Press Fn again to finish.

fn + I

New Lippye notePress and release, speak, then press Fn to finish.

fn + S

New sticky notePress and release, speak, then press Fn to finish.

fn +

Speak an ActionEnable Lippye Actions in Settings. Press and release Fn + Control, then speak.

Notes and stickies stop listening after about 20 seconds of silence. Empty voice drafts close automatically; notes with text stay saved. To add speech to an existing note, click its text and use Fn, or click its microphone button. The + button still creates a blank sticky for typing.

ONLY WHEN YOU NEED THEM

Permissions for optional Actions.

Ordinary dictation and notes need Microphone; Fn shortcuts also need Accessibility. Turn on Actions in Lippye Settings if you want to control your Mac by voice.

IF SOMETHING GETS STUCK

A quick check.

Fn opens emoji or Apple Dictation

Recheck step 4. Set Fn / Globe to Do Nothing and remove Fn from Apple Dictation’s shortcut, then enable Lippye shortcuts again.

I can record, but text does not appear

For another app, click its editable text field before starting and keep the same field selected until Lippye finishes. Check Accessibility. For Lippye Notes or Sticky Notes, click inside the note or use its microphone button. If you edited the note while recognition ran, Lippye keeps the dictation as a separate note to preserve your edits.

Lippye cannot hear me

Check the Microphone switch, choose the correct input in Lippye Settings, and check that the microphone is not muted. Wait until the note says Listening before speaking. The waveform should move while you talk.

Shortcuts stopped working after an update

Quit the previous copy and open Lippye from Applications. Recheck the Lippye entry under Accessibility, then click Enable Shortcuts. If macOS asks to quit and reopen Lippye, do that before retrying.

macOS says the app is damaged or cannot be verified

Stop and download a fresh, signed copy from the source that supplied Lippye. Contact info@lippye.com if it persists. A normal install does not require Terminal commands or turning off Gatekeeper.

Screenshots: macOS System Settings, cropped to the relevant controls. Labels can vary by macOS version. Apple help: Microphone · Accessibility.